rev. Dec. 17, 2017
1. KMLファイルの作成の前に
1.1 KMLチュートリアル
https://developers.google.com/kml/documentation/kml_tut?hl=ja
上記サイトに掲載されている。これは,
KML 入門用ドキュメント
https://developers.google.com/kml/documentation/?hl=ja
内のリンクにある。
このうちで,地図画像を取り込むkmlファイルを作るのに必要な「地面オーバーレイ」を理解する上で重要な情報を抜き出します。
1.2 KMLとは
KML key markup language は、Google Earth、Google マップ、モバイル Google マップなどの Earth ブラウザで、地理データの表示に使用するファイル形式である。XML 標準をベースにしており、ネストされた要素や属性を含むタグ構造を使用する。すべてのタグで,大文字と小文字は区別される。タグは KML レファランスの定義どおりに記述する必要がある。タグは、 レファランスで記述されている順番で要素内に指定する必要があります。
.kml または .kmz 拡張子を付けて保存したテキスト ファイルは、Earth ブラウザで表示できる。
ヒント: Google Earth 内にあるアイテムの KML「コード」を見るには、Google Earth の 3D ビューアの左のペーンの各項目を右クリックして [コピー] をクリックして, テキスト エディタに貼り付けると,対応する KML テキストを参照することができる。
1.3 詳細情報については
KML 2.2 リファレンス
https://developers.google.com/kml/documentation/kmlreference?hl=ja#description
では、KML ファイルのフォーマットについて詳しく説明されている。
1.4 基本的な KML ドキュメントの例としての目印 landmark
最も単純なタイプの KML ドキュメントは、Google Earth 上で直接作成するものである。テキスト エディタで KML を編集したり作成したりする必要はない。
目印は Earth の地表上の特定の位置にマークを表示するもので、黄色いピンなどのアイコンで示される。最も単純な目印は、目印の場所を指定する <Point> 要素だけを含みます。目印には名前やカスタム アイコンを指定したり、他のジオメトリ要素を追加したりできる。
Google Earth で KML Samples ファイルを開いて、Placemarks サブフォルダを展開します。このフォルダには、simple、floating、extruded の 3 種類の目印が含まれるが,simple 目印の KML コードは次のとおり:
<?xml version="1.0" encoding="UTF-8"?>
<kml xmlns="http://www.opengis.net/kml/2.2"> <Placemark>
<name>Simple placemark</name>
<description>Attached to the ground. Intelligently places itself at the height of the underlying terrain.</description>
<Point>
<coordinates>-122.0822035425683,37.42228990140251,0</coordinates>
</Point>
</Placemark> </kml>
このファイルの構造は次のとおりです:
XML ヘッダー。すべての KML ファイルの 1 行目。この行の前にスペースや他の文字を入力することはできない。
KML 名前空間宣言。すべての KML 2.2 ファイルの 2 行目。
name: 目印のラベルとして使用される名前
description: 目印の「バルーン」に表示される説明
Point: 地表での目印の位置を指定する (longitude、latitude、オプションの altitude)
ちなみに,この例の目印は Google の Building 41 を指すが、これは Google Earth のプログラムが開発された所である。
なお,簡便に利用するには,次のサイトが良いだろう。
http://dagik.org/kml_intro/point.html
2. 地図画像の地面オーバーレイ
2.1 2001 年のエトナ山の噴火の例
地面オーバーレイを使うと、地表上に画像を貼り付けることができる。
<Icon> 要素に、オーバーレイする画像の .jpg または.pngファイルへのリンクを指定する。KML Samples ファイルにある地面オーバーレイの例を次に示します。この例は 2001 年のエトナ山の噴火画像を示す:
____________________
<?xml version="1.0" encoding="UTF-8"?>
<kml xmlns="http://www.opengis.net/kml/2.2"> <Folder>
<name>Ground Overlays</name>
<description>Examples of ground overlays</description>
<GroundOverlay>
<name>Large-scale overlay on terrain</name>
<description>Overlay shows Mount Etna erupting on July 13th, 2001.</description>
<Icon>
<href>http://developers.google.com/kml/documentation/images/etna.jpg</href>
</Icon>
<LatLonBox>
<north>37.91904192681665</north>
<south>37.46543388598137</south>
<east>15.35832653742206</east>
<west>14.60128369746704</west>
<rotation>-0.1556640799496235</rotation>
</LatLonBox>
</GroundOverlay>
</Folder> </kml>
____________________
この例の説明を次に示す。
XML ヘッダーと KML 名前空間宣言
<?xml version="1.0" encoding="UTF-8"?>
<kml xmlns="http://www.opengis.net/kml/2.2">
<Folder>
上の二行は必ず必要。GEに読み込むと,場所パネルにこのフォルダが表示される。
<name>Ground Overlays</name>
<description>Examples of ground overlays</description>
<GroundOverlay>
<name>Large-scale overlay on terrain</name>
<description>Overlay shows Mount Etna erupting on July 13th, 2001.</description>
GroundOverlaysは,関係ファイル群を含むフォルダー名
<Icon>
<href>http://developers.google.com/kml/documentation/images/etna.jpg</href>
</Icon>
これは,Googleのサイトに配置されている画像のリンクであるが, 利用者のウェブサイトでももちろん問題ない。こういう指定を絶対パスという。
<LatLonBox>
<north>37.91904192681665</north>
<south>37.46543388598137</south>
<east>15.35832653742206</east>
<west>14.60128369746704</west>
<rotation>-0.1556640799496235</rotation>
</LatLonBox>
さて,
KML Reference
https://developers.google.com/kml/documentation/kmlreference
で, <rotation>...</rotation>を検索すると,次の記述がある。
<LatLonBox>
Specifies where the top, bottom, right, and left sides of a bounding box for the ground overlay are aligned.
<north> Specifies the latitude of the north edge of the bounding box, in decimal degrees from 0 to ±90.
<south> Specifies the latitude of the south edge of the bounding box, in decimal degrees from 0 to ±90.
<east> Specifies the longitude of the east edge of the bounding box, in decimal degrees from 0 to ±180. (For overlays that overlap the meridian of 180° longitude, values can extend beyond that range.)
<west> Specifies the longitude of the west edge of the bounding box, in decimal degrees from 0 to ±180. (For overlays that overlap the meridian of 180° longitude, values can extend beyond that range.)
<rotation> Specifies a rotation of the overlay about its center, in degrees. Values can be ±180. The default is 0 (north). Rotations are specified in a counterclockwise direction.
例として,
<LatLonBox>
<north>48.25475939255556</north>
<south>48.25207367852141</south>
<east>-90.86591508839973</east>
<west>-90.8714285289695</west>
<rotation>39.37878630116985</rotation>
</LatLonBox>
</GroundOverlay>
</Folder> </kml>
このファイルの冒頭の 2 行(XML ヘッダーと KML 名前空間宣言)が最初の例と同じである点に注目して欲しい。いつも同じ二行を冠する必要がある。
2.2 kmlファイルは,実際にはどうすればいいのか
下記のサイトに掲載されている
https://developers.google.com/kml/documentation/kmzarchives?hl=ja
つぎのファイル buffetthawaiitour.kmz をここに示す。
kmzファイルはzip圧縮ファイルであり,macの場合,StuffIt Expanderを使って解凍する。
「Windows10の場合,まず、zipファイルを右クリックし「プロパティ」を開きます。 次に「全般」タブの「プログラム:〜〜」と書かれた右の方に「変更」ボタンがあるのでクリックします。 「この.zipファイルを今後どうやって開きますか?」と聞かれるので、「WinZip」ではなく「エクスプローラー」を選び、「OK」をクリックする。これで設定は完了す。 再度zipファイルを右クリックすると「すべて展開」が出てくる。
解凍すると,一つのフォルダーが現れる。この中には,
doc.kmlファイルと,filesというフォルダがある。doc.kmlはエディターで開くことができる。3210行にも及ぶファイルである。filesフォルダーには,4画像pngファイルと一つのmp3ファイル(8.4MB)が入っている。計8.7MBである。1ファイル10MB以内のおよその目安以下なので問題ない。
第565〜568行を見ると,
<gx:SoundCue>
<href>files/Margaritaville.mp3</href>
</gx:SoundCue>
第142〜144行を見ると,
<Icon>
<href>files/jb_plane.png</href>
</Icon>
となっており,kmlファイルからの画像または音声ファイルへの参照は,相対パスで示されている。
レファランス
https://developers.google.com/kml/documentation/kmlreference?hl=ja#gxsoundcue
でみると,
<gx:SoundCue>
<gx:SoundCue id="ID">
<href>http://www.example.com/audio/trumpets.mp3</href> <!-- any URI -->
<gx:delayedStart>0</gx:delayedStart> <!-- double -->
</gx:SoundCue>
Contains an <href> element specifying a sound file to play, in MP3, M4A, or AAC format. It does not contain a duration. The sound file plays in parallel to the rest of the tour, meaning that the next tour primitive takes place immediately after the <gx:SoundCue> tour primitive is reached. If another sound file is cued before the first has finished playing, the files are mixed. The <gx:delayedStart> element specifies to delay the start of the sound for a given number of seconds before playing the file.
と示されている。
3. 地図画像の具体例
GrassGISで衛星画像を表示して,矩形領域のイメージデータを保存する場合を想定する。
3.1 GrassGIS表示画像の抽出____________________
r.info map=AsukaIkonos_rescaled432composite@Asuka
でファイル情報を
見ると, 解像度は1mで,
平面直角座標系値は,
N: -162355.5
W: -20198.5
S: -170041.5
E: -14012.5
となっている。
平面直角座標系を経緯度座標系に次にサイト
surveycalc/surveycalc/xy2blf.html
で変換し, 度分秒表示を度表示に次のエクセルファイルを使って変換した。
北縁:
緯度 34°32′10.58977″
34.53627494
西縁:
経度 135°46′47.82502″
135.7799514
南縁:
緯度 34°28′01.50627″
34.46708508
東縁:
経度 135°50′50.89044″
135.8474696
上述の,r.infoによるmap情報には,筆者が実施したこのmapの作成履歴が含まれている。
r.composite
red="AsukaIkonos_nir_rescaled@Asuka"
green="AsukaIkonos_red_rescaled@Asuka"
blue="AsukaIkonos_grn_rescaled@Asuka"
output="AsukaIkonos_rescaled432composite"
level: 32
これには,monitorでのrgbフルカラー表示について,rの箱には近赤外線であるnir near infra-red,gの箱にはred,bの箱にはgreenが対応させたことが示されている。
で, r.out.pngを実行して,デスクトップにpngファイルを出力した。この容量は53.9MBなので,GEでの表示にトラブルがないほぼ10MB以下に画質を落とす必要がある。Photoshopにて,Web出力すると,10.4MB。これなら問題ない。AsukaIkonos_rescaled432composite.jpg
3.2 追加: Rasterマップの一部の場合____________________
1. GrassGISで衛星画像を表示して必要な部分のgridの上端,下端,左端,右端の座標値を読み込む。Grassの場合,座標表現が,(easting, northing)になっているので注意する。
設定>領域>領域表示,で表示されたテキストを,外部のテキストエディターにコピペする。そうして,設定>領域>領域設定,でNSEWの境界値を入力する。
2. 先の4端の値を使ってregionを設定して,画像を表示する。
3. 表示中の画像をイメージ出力する。jpgかpngで。
4. 4端の座標値を経緯度座標系に変換する。座標値は度単位で記録すること。
3.3 kmlファイルの作成: pcにコンテンツを含む場合____________________
前述の buffetthawaiitour.kmzでは,doc.kmlというkmlファイルとここに記述されている関連ファイルが入るfilesフォルダからなっている。その形を取ると,
mapファイル: YamatoSanzanIkonos1.jpg
mapを格納するフォルダー名:Ikonos1
とすると,
<?xml version="1.0" encoding="UTF-8"?>
<kml xmlns="http://www.opengis.net/kml/2.2">
<Folder>
<name>Ikonos1</name>
<description>ground overlays using YamatoSanzanIkonos1</description>
<GroundOverlay>
<name>Large-scale overlay on terrain</name>
<description>Overlay shows Ikonos image on Sep 16th, 2003.</description>
<Icon>
<href>./files/YamatoSanzanIkonos1.png</href>
</Icon>
<LatLonBox>
<north>34.51423769</north>
<south>34.49396327</south>
<east>135.823016</east>
<west>135.7955366</west>
<rotation>0</rotation>
</LatLonBox>
</GroundOverlay>
</Folder>
</kml>
文字列の中の幾つかの文字は文字化けするので,これを回避するために, <![CDATA[ , と , ]]> ,で囲む必要がある。この間に入れた文字はそのまま表示される。例えば次のように,
<name><![CDATA[デジタルアース<digital earth>]]></name>
この場合, kmzファイルを作成する必要がある。Ikonos1と名付けたフォルダーに,このkmlファイルと,画像などが入ったfilesというフォルダを入れて,zip圧縮して, 「.zip」を,「.kmz」に変更すると,kmzファイルが作成される。
なお,上の相対パス指定はうまくいかない。(一般的な相対パスの説明)
<href>./files/YamatoSanzanIkonos1.png</href>
これで,実行すると,
<href>/Users/moto/Desktop/files/YamatoSanzanIkonos1.jpg</href>
となっていて,filesフォルダの親フォルダであるYamatoSanzanIkonos3が省かれている。
<href>/Users/moto/Desktop/YamatoSanzanIkonos3/files/YamatoSanzanIkonos1.jpg</href>
上記のように絶対パスで表現するしか,PCコンテンツ利用にはうまくいかない。
3.4 kmlファイルの作成: web-siteにコンテンツを配置する場合____________________
これだと問題がない。ネットワーク環境で誰でも見ることができる。次に一例を示す。地図画像ファイルは,当方のウェブサイトにアップしているので,kmzファイルの必要性はなくて,kmlの1ファイルで足りる。この場合,kmlファイル名がGEの見出しになるので,kmlファイル名自体をfile名にする必要がある。
<?xml version="1.0" encoding="UTF-8"?>
<kml xmlns="http://www.opengis.net/kml/2.2" xmlns:gx="http://www.google.com/kml/ext/2.2" xmlns:kml="http://www.opengis.net/kml/2.2" xmlns:atom="http://www.w3.org/2005/Atom">
<GroundOverlay>
<name>YamatoSanzanIkonos4</name>
<description><![CDATA[ground overlays using AsukaIkonos_rescaled432composite.jpg.---- red="AsukaIkonos_nir_rescaled@Asuka"
green="AsukaIkonos_red_rescaled@Asuka"
blue="AsukaIkonos_grn_rescaled@Asuka"
level: 32 --- aquisited at Sep. 26, 2003--- ]]></description>
<Icon>
<href>http://motochan.sakura.ne.jp/public_html/FileTransfer/kml/AsukaIkonos_rescaled432composite.jpg</href>
</Icon>
<LatLonBox>
<north>34.53627494</north>
<south>34.46708508</south>
<east>135.8474696</east>
<west>135.7799514</west>
</LatLonBox>
</GroundOverlay>
</kml>
これをエディターにコピペして,ファイル拡張子をkmlとしたファイルが YamatoSanzanIkonos4.kmlである。これをダウンロードして,GEのアイコンにドラッグアンドドロップすれば,表示される。
4. ベクトルマップのkml出力とGEでの表示
4.1 GrassGISによるベクトルマップのkml出力
ベクトルマップのkml出力に対応する環境は,2017年9月末現在,ネット上ではフリーで提供されていないようである。GrassGISの下記ヘルプの機能を使う。
https://grass.osgeo.org/grass70/manuals/v.out.ogr.html
GrassGISで,ファイル/ベクトルマップのエキスポート/一般的なエキスポートフォーマット,でパネルが開く。Name of output OGR datasource,でkmlの出力ファイル名を入力しても,拡張子が自動ではつかないので,Asukagawa_terr_b.kml,などのように自分でつける必要がある。ベクトルマップ(ポリゴン)が持つ複数の地物featuresを選択できない。経験的には,autoにした場合,自動で赤の縁取りのポリゴンが出力される。出力先は,ユーザーのルートである。木庭の場合,macOSなので, /Users/moto/。
GrassGISの使い方や,イラレでのベクトル作図作業とGrassGISへの出力などは, 木庭のウェブサイトの地理情報システムのコンテンツに示している。
http://motochan.sakura.ne.jp/public_html/GIS_Frameset.html
フリーGISソフトとして,Qgisが主流になっているが,これは閲覧ソフトであり,独自の研究成果を積み上げ得る創造ツールではない。Grass離れ傾向があるが,GrassGISの開発者のみなさんには今後も継続していただきたいと思う。
4.2 出力されたkmlファイルの編集
出力されたkmlファイルの中身は次のようなものである。
<?xml version="1.0" encoding="utf-8" ?>
<kml xmlns="http://www.opengis.net/kml/2.2">
<Document id="root_doc">
<Schema name="Asukagawa_terr_a" id="Asukagawa_terr_a">
<SimpleField name="cat" type="int"></SimpleField>
<SimpleField name="AI_LAYER" type="string"></SimpleField>
</Schema>
<Folder><name>Asukagawa_terr_a</name>
<Placemark>
<Style><LineStyle><color>ff0000ff</color></LineStyle><PolyStyle><fill>0</fill></PolyStyle></Style>
<ExtendedData><SchemaData schemaUrl="#Asukagawa_terr_a">
<SimpleData name="cat">1</SimpleData>
<SimpleData name="AI_LAYER">Asukagawa_terr_a</SimpleData>
</SchemaData></ExtendedData>
<Polygon><outerBoundaryIs><LinearRing><coordinates>135.819034484132828,34.471641920847993 135.81902815161547,34.471662385719377 (中略)135.819250520377494,34.471729323877803 135.819034484132828,34.471641920847993</coordinates></LinearRing></outerBoundaryIs></Polygon>
</Placemark>
ポリゴン一つ一つに,この<Placemark>.........</Placemark>,が続いてゆく。
元のGrassの座標系は平面直角座標系VIであるが,kml出力と同時に,GEが対応する経緯度座標系(ddd.dddddddddddddd)に変換されている。上記出力中の, <LineStyle><color>ff0000ff</color></LineStyle>,に見られるように,ポリゴンの縁取りの色は,つねに, ff0000ff,つまり「透明度ゼロの赤色」である。線の太さは指定されていない。
フィールドワークでGEまたはモバイルGIS上に表示したいのは,ポリゴンであれば縁取りである。ある程度の太さが必要で,同種のカテゴリーに属する事物は同色で表示されねばならない。
その参考になるのは,
縁取りについては, Googleの次のサイトにある。
https://developers.google.com/kml/documentation/kmlreference#linestyle
いま,直接関係するのは,次の部分である。
<LineStyle id="ID">
<!-- inherited from ColorStyle -->
<color>ffffffff</color> <!-- kml:color -->
<width>1</width> <!-- float -->
</LineStyle>
色については,
Elements Specific to ColorStyle
https://developers.google.com/kml/documentation/kmlreference#colorstyle
で,
<color>
Color and opacity (alpha) values are expressed in hexadecimal notation. The range of values for any one color is 0 to 255 (00 to ff). For alpha, 00 is fully transparent and ff is fully opaque. The order of expression is aabbggrr, where aa=alpha (00 to ff); bb=blue (00 to ff); gg=green (00 to ff); rr=red (00 to ff). For example, if you want to apply a blue color with 50 percent opacity to an overlay, you would specify the following: <color>7fff0000</color>, where alpha=0x7f, blue=0xff, green=0x00, and red=0x00.
kmlカラーは特殊で,たとえば次のサイトが実用に適している。
http://www.zonums.com/gmaps/kml_color/
このサイトで使用したいカラーを選んでopacity濁度100%にしても必ずしも,そうはならない。kmlカラーは,8桁,AABBGGRR,の16進数で表示される。___AA(opacity):alpha, BB:Blue, GG:Green, RR:Red___。
透明度をゼロにするためには,16進数についてはたとえば,次のサイトにわかりやすく示されている。
http://yarinaosinosansu.nomaki.jp/nansin3/index.html
透明度もRGBの三原色も256階調で表現される。16進数で2桁表示で,最小値は00で,最大値はFFである。これを10進数で表すと,
00 = 0*16^0 + 0*16^1 = 0, FF = F*16^0 + F*16^1 = 15*1 + 15*16 = 255 となる。つまり,256階調になっている。このページの例は,飛鳥川の水路中の段丘区分であり,a,b,c,dの4面からなり,それぞれに,赤色 FF0000FF, 橙色 FF1478FF,黄緑色 6478FF00,黄色 FF78FFF0を対応させている。
以上から, kmlファイルをテキストエディタで,検索置換すればよい。例えば,b面だと,
ff0000ff</color>を検索して,FF1478FF</color><wide>3</wide>で置換。
こういった流れをわかりやすく示しているサイトを次に紹介しよう。
http://dagik.org/kml_intro/line.html
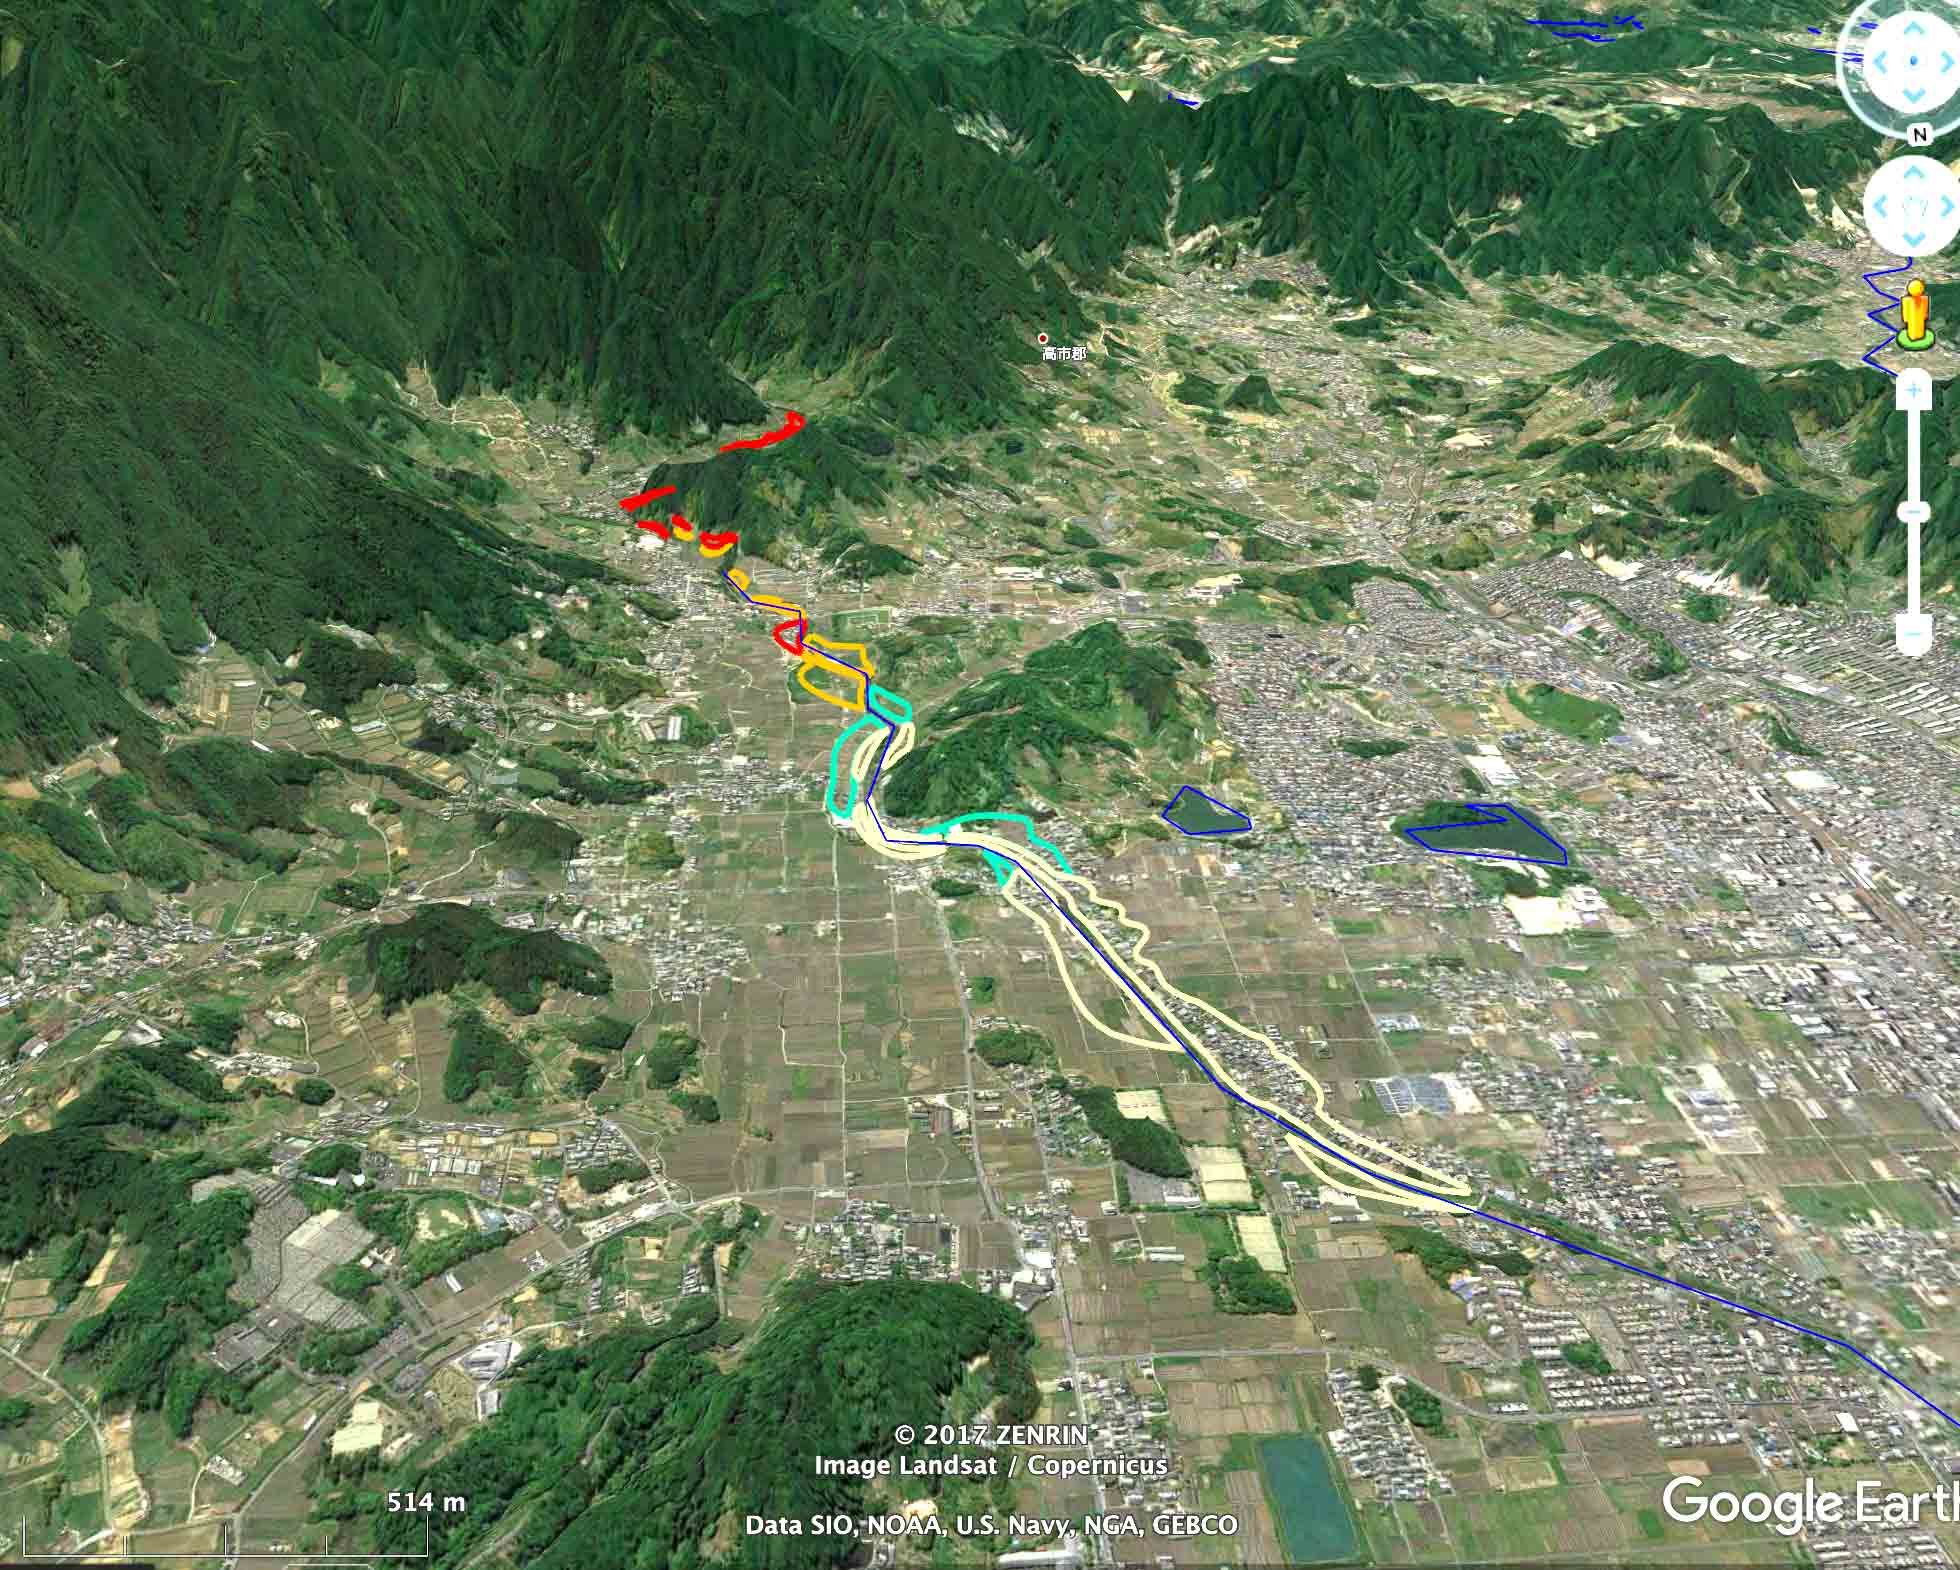
このようにしてkmlファイルを編集したあと,GE上で表示した図を次に示そう。
5. 目印マーク編集例
5.1 レーザー測量結果でのレーザー測距儀設置点の弁別
測量地点をGrassGISに取り込んでその点ベクトルをkml出力すると,Google Earthで表示可能なkmlファイルを得ることができる。デフォルトでは黄色の目印ランドマークである黄色ピンが使われる。ここではレーザー測距儀設置点については,オレンジ色のピンにしたい。その結果が次の図。沖永良部島知名町徳時海岸での調査結果。

GrassGISからkml出力したテキストに付け加えたテキストを赤字としている。構造が理解できるように,空白行を挿入しているが,使用する際は不要ではある。
<?xml version="1.0" encoding="utf-8" ?>
<kml xmlns="http://www.opengis.net/kml/2.2">
<Document id="root_doc">
<Schema name="laser_setting_sites" id="laser_setting_sites">
<SimpleField name="cat" type="int"></SimpleField>
<SimpleField name="northing" type="float"></SimpleField>
<SimpleField name="easting" type="float"></SimpleField>
<SimpleField name="label" type="string"></SimpleField>
</Schema>
<Folder><name>laser_setting_sites</name>
<Style id="sn_ylw-pushpin0">
<IconStyle>
<color>ff0080ff</color>
<scale>1.1</scale>
<Icon>
<href>http://maps.google.com/mapfiles/kml/pushpin/ylw-pushpin.png</href>
</Icon>
<hotSpot x="20" y="2" xunits="pixels" yunits="pixels"/>
</IconStyle>
</Style>
<Style id="sh_ylw-pushpin">
<IconStyle>
<color>ff0080ff</color>
<scale>1.3</scale>
<Icon>
<href>http://maps.google.com/mapfiles/kml/pushpin/ylw-pushpin.png</href>
</Icon>
<hotSpot x="20" y="2" xunits="pixels" yunits="pixels"/>
</IconStyle>
</Style>
<StyleMap id="msn_ylw-pushpin4">
<Pair>
<key>normal</key>
<styleUrl>#sn_ylw-pushpin0</styleUrl>
</Pair>
<Pair>
<key>highlight</key>
<styleUrl>#sh_ylw-pushpin</styleUrl>
</Pair>
</StyleMap>
<Placemark>
<name> ls_1</name>
<ExtendedData><SchemaData schemaUrl="#laser_setting_sites">
<SimpleData name="cat">1</SimpleData>
<SimpleData name="northing">-625473.93</SimpleData>
<SimpleData name="easting">-96053.44</SimpleData>
<SimpleData name="label">ls_1</SimpleData>
</SchemaData></ExtendedData>
<styleUrl>#msn_ylw-pushpin4</styleUrl>
<Point>
<coordinates>128.529127816795494,27.353836086293843</coordinates></Point>
</Placemark>
<Placemark>
<name> ls_2</name>
<ExtendedData><SchemaData schemaUrl="#laser_setting_sites">
<SimpleData name="cat">2</SimpleData>
<SimpleData name="northing">-625477.63</SimpleData>
<SimpleData name="easting">-96052.92</SimpleData>
<SimpleData name="label">ls_2</SimpleData>
</SchemaData></ExtendedData>
<styleUrl>#msn_ylw-pushpin4</styleUrl>
<Point><coordinates>128.529133363321449,27.353802733551959</coordinates></Point>
</Placemark>
<Placemark>
<name> ls_3</name>
<ExtendedData><SchemaData schemaUrl="#laser_setting_sites">
<SimpleData name="cat">3</SimpleData>
<SimpleData name="northing">-625580.37</SimpleData>
<SimpleData name="easting">-96022.39</SimpleData>
<SimpleData name="label">ls_3</SimpleData>
</SchemaData></ExtendedData>
<styleUrl>#msn_ylw-pushpin4</styleUrl>
<Point><coordinates>128.529449995526562,27.352877739208672</coordinates></Point>
</Placemark>
<Placemark>
<name> ls_4</name>
<ExtendedData><SchemaData schemaUrl="#laser_setting_sites">
<SimpleData name="cat">4</SimpleData>
<SimpleData name="northing">-625622.18</SimpleData>
<SimpleData name="easting">-96029.04</SimpleData>
<SimpleData name="label">ls_4</SimpleData>
</SchemaData></ExtendedData>
<styleUrl>#msn_ylw-pushpin4</styleUrl>
<Point><coordinates>128.529386077444457,27.352499973114302</coordinates></Point>
</Placemark>
(中略)
<Placemark>
<name> ls_14</name>
<ExtendedData><SchemaData schemaUrl="#laser_setting_sites">
<SimpleData name="cat">14</SimpleData>
<SimpleData name="northing">-626659.42</SimpleData>
<SimpleData name="easting">-95207.8</SimpleData>
<SimpleData name="label">ls_14</SimpleData>
</SchemaData></ExtendedData>
<styleUrl>#msn_ylw-pushpin4</styleUrl>
<Point><coordinates>128.537766694369509,27.343197195101755</coordinates></Point>
</Placemark>
</Folder>
</Document></kml>
以 上